Installing Positive Input Ventilation in UK Homes
A practical UK homeowner guide to installing Positive Input Ventilation (PIV): costs, BBA standards, installation steps, and running costs.
- Written by
- Net Zero Home Scheme editorial team
- Last updated
- Topic
- energy efficiency, home energy
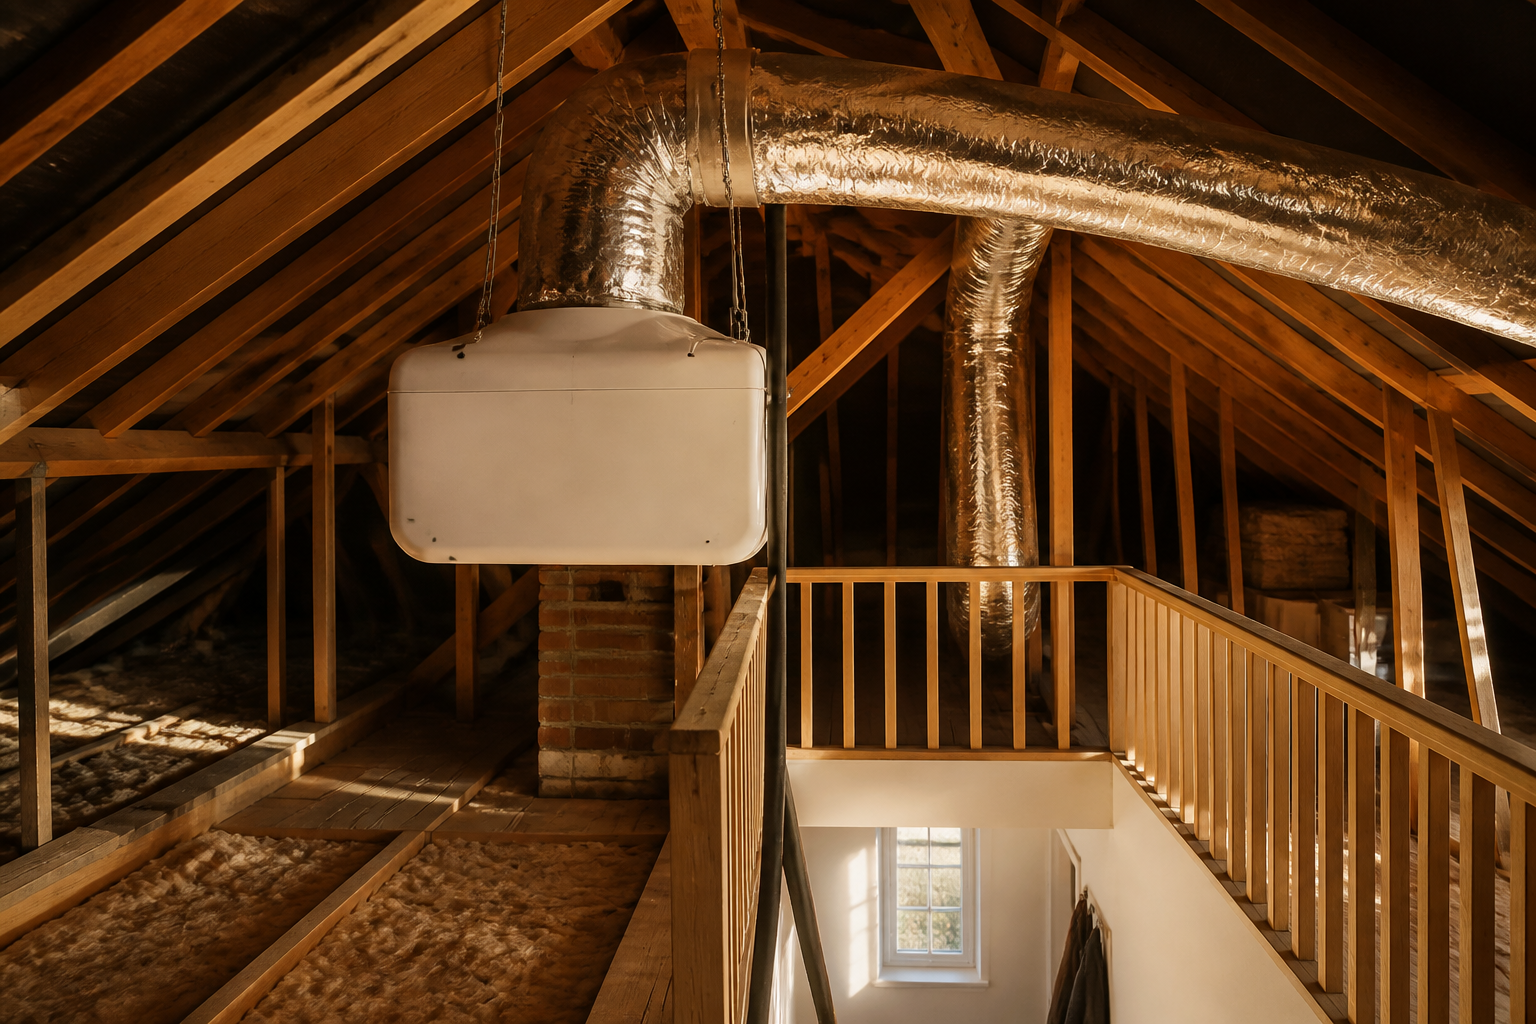
Condensation, black mould, and damp air are among the most persistent problems in British housing, particularly in modernised properties where draughts have been sealed without adequate replacement ventilation. While mechanical ventilation with heat recovery (MVHR) is the ideal solution for comprehensive whole-house retrofits, installing extensive ductwork through existing walls and ceilings can be invasive and expensive. Positive Input Ventilation (PIV) offers a proven alternative, supplying continuous, filtered fresh air into the dwelling to displace moisture and improve indoor air quality.
First developed in the 1970s and now installed in over one million UK homes, PIV systems work on the principle of volumetric air displacement. This practical guide covers how PIV technology functions, what to check before installation, expected equipment and labour costs, required tradesperson accreditations, and realistic running expenses.
How Positive Input Ventilation Works
A PIV unit operates continuously at a very low trickle speed, gently introducing fresh, filtered air into a central area of the property, usually a central landing or hallway. This action creates a slight positive air pressure inside the home relative to the outside atmosphere.
Because air naturally moves from high-pressure areas to low-pressure areas, this positive pressure continuously pushes stale, moisture-laden internal air out through the structure's natural leakage paths, such as window trickle vents, keyholes, and structural gaps. Approved Document F (Ventilation) of the UK Building Regulations recognises continuous mechanical supply ventilation as an effective method for controlling indoor humidity and maintaining indoor air quality.
There are two primary configurations for domestic PIV installations:
- Loft-mounted units: Installed in the roof space of houses and top-floor maisonettes. Fresh air is drawn from the loft cavity or directly from outside via a roof gable vent, filtered, and pushed down into the central hallway through a ceiling-mounted diffuser.
- Wall-mounted units: Designed for flats and apartments without loft access. These compact units mount on an external wall, drawing fresh air directly from outside through a wall core and blowing it into a central hallway.
Assessing Your Property for a PIV System
Before purchasing equipment or hiring an installer, you must evaluate several physical aspects of your property to ensure a PIV unit will perform effectively and safely.
First, examine your loft space if you are choosing a loft-mounted system. The loft must be structurally sound, dry, and well-ventilated to avoid drawing in damp or stagnant air. If the loft contains loose-fill insulation, fiberglass roll end-cuts, or significant dust, an intake duct extending to an external soffit or gable wall is recommended.
Second, check internal air circulation paths. For positive pressure to push air through the entire building, air must be able to move freely between rooms. Standard guidance requires an undercut of at least 10 millimetres beneath internal doors, or functional background trickle vents fitted to windows in moisture-producing rooms such as kitchens and bathrooms.
Third, confirm environmental safety factors. If your property is located in a high-risk radon area as designated by the UK Health Security Agency, or if you have an attached garage, the PIV intake must be carefully situated. In radon-affected areas, a PIV unit can actually help reduce indoor radon concentrations by pressurising the living area, but the intake air source must be clean and uncontained.
PIV Installation Checklist and Tech Specifications
The table below outlines key technical specifications, installation metrics, and typical compliance standards for standard UK domestic PIV installations.
| Parameter | Loft-Mounted PIV Unit | Wall-Mounted PIV Unit |
|---|---|---|
| Typical Supply & Fit Cost | £800 to £1,400 | £900 to £1,600 |
| Baseline Power Consumption | 3 to 6 Watts | 4 to 8 Watts |
| Optional Pre-Heater Rating | 300 to 500 Watts | 200 to 400 Watts |
| Average Installation Time | 3 to 5 hours | 4 to 6 hours |
| Main Filter Replacement Interval | 3 to 5 years | 2 to 3 years |
| Key Regulatory Standards | Building Regs Part F & Part P | Building Regs Part F & Part P |
| Key Product Certification | BBA Approval | BBA Approval |
Step-by-Step Installation Process and Timeline

Installing a loft-mounted PIV system in a standard two-storey UK home is generally straightforward and completed within a single day. The standard workflow follows four distinct stages.
1. Site Survey and Location Planning (30 to 60 Minutes)
The installer inspects the loft area and selects the central ceiling point, typically above the main stairwell or central landing. They verify that no ceiling joists, pipework, or electrical cables run through the proposed diffuser opening.
2. Mounting and Duct Connection (1 to 2 Hours)
The main PIV unit is suspended from the roof rafters using anti-vibration hanging strips or fixed onto a rigid mounting board. Anti-vibration suspension is crucial to prevent motor hum from transmitting through timber ceiling joists. Short, insulated flexible ducting is attached between the unit outlet and the ceiling location.
3. Fitting the Ceiling Diffuser (1 Hour)
A circular aperture is cut into the ceiling plasterboard. The installer inserts the adjustable air diffuser, sealing the gap with acoustic sealant, and connects the insulated ductwork above. The diffuser plates are adjusted to direct airflow horizontally along the ceiling surface, ensuring cold air mixes with warm upper-level room air before descending.
4. Electrical Connection and Commissioning (1 to 2 Hours)
A qualified electrician hardwires the unit into an unswitched fused spur, typically branched from the lighting circuit or a dedicated fused spur in accordance with BS 7671 wiring regulations. The installer sets the unit's fan speed based on the overall floor area of your property (measured in square metres) and configures the integrated temperature sensors.
Installer Accreditations and Building Regulations
To ensure safety, performance, and compliance with local authority building control, check that your installation meets key UK standards.
Look for equipment certified by the British Board of Agrément (BBA). BBA certification confirms that the PIV unit has undergone rigorous independent testing for air delivery rates, acoustic performance, and long-term durability.
Electrical work must comply with Building Regulations Part P (Electrical Safety in Dwellings). Your electrician should be registered with an approved competent person scheme such as NICEIC, NAPIT, or ELECSA. Upon completion, they must issue an Electrical Installation Certificate (EIC) confirming compliance with BS 7671.
Ventilation performance should align with Building Regulations Approved Document F. Installers should be trained under schemes such as the BPEC Ventilation Installer Scheme or hold manufacturer-specific accreditation from established UK ventilation producers.
Realistic Running Costs and Maintenance Requirements
PIV units are designed for continuous low-power operation. In baseline mode, the internal direct-current motor draws between 3 and 6 Watts of electricity. Running continuously, a 4-Watt fan consumes roughly 35 kilowatt-hours (kWh) of electricity per year. Based on standard UK domestic electricity prices reported by the Energy Saving Trust, continuous fan operation costs approximately £8 to £12 per year.
Many UK PIV units include an integrated, low-wattage tempering heater element (typically 300 to 500 Watts). This heater automatically engages when incoming loft air temperatures fall below a preset threshold (usually 10°C) to prevent cold draughts on the landing. If the pre-heater runs for 400 to 600 hours during cold winter months, it will consume an additional 150 to 250 kWh, adding approximately £35 to £60 to annual electricity bills. Most units allow homeowners to disable the pre-heater or adjust its temperature threshold.
Maintenance requirements are minimal:
- Filter cleaning or replacement: Standard G4 or F7 air filters capture dust, pollen, and fine particulate matter. They require inspection every 12 months and full replacement every 3 to 5 years, costing between £25 and £50.
- Diffuser cleaning: Wipe down the ceiling diffuser annually with a damp cloth to remove surface dust accumulations.
- Airflow check: Verify annually that air is flowing freely from the diffuser and that no loft insulation has obstructed the intake fan.
What this means for you
If your home suffers from persistent window condensation, damp corners, or lingering indoor odors, Positive Input Ventilation provides a low-disruption, cost-effective mechanical solution. Before committing, confirm that you have an appropriate loft space or external wall location and engage a Part P qualified electrician to handle the electrical installation.
When upgrading your home's thermal performance, ventilation must always be considered alongside insulation and heating retrofits. The Net Zero Home Scheme offers UK employees access to pre-vetted, accredited installers and preferential pricing across home energy efficiency installations, helping households plan coordinated upgrades safely.
Frequently asked questions
Does a PIV system make your house cold in winter?
A standard PIV unit introduces outdoor or loft-temperature air into your central hallway, which can create a subtle cool breeze directly beneath the ceiling diffuser during very cold weather. However, most modern units include an intelligent comfort heater (300 to 500 Watts) that tempers cold air when loft temperatures drop below 10°C. Directing the diffuser's airflow along the ceiling helps the incoming air mix quickly with warm indoor air, avoiding noticeable room temperature drops.
Can you install a PIV unit yourself without an electrician?
While fixing the loft unit and cutting the ceiling diffuser hole are accessible tasks for competent DIY enthusiasts, connecting the unit to your home's fixed electrical wiring must be completed by a qualified electrician under Building Regulations Part P. Hardwiring into a fused spur requires professional testing and certification to ensure electrical safety and compliance with BS 7671 regulations.
How quickly will a PIV system eliminate condensation and mould?
In most UK homes, surface condensation on windows drops significantly within 24 to 48 hours of turning on a PIV system. Full drying out of damp walls, soft furnishings, and plaster can take between one and two weeks, depending on initial moisture levels and ambient indoor heating. Existing black mould must be physically cleaned away with a specialist wash after installation, as PIV prevents new growth but cannot clean existing mould spores.
Sources
- Approved Document F: Ventilation (2021 edition), HM Government
- Ventilation for UK Homes Guide, Energy Saving Trust
- BBA Ventilation Product Certification, British Board of Agrément
- Electrical Safety in Dwellings: Approved Document P, HM Government